Policy-driven Compliance
Harness the power of SBOM Observer to craft robust software policies tailored to your needs. Address security threats, meet business objectives, and ensure regulatory compliance effortlessly. Opt for the simplicity of the Visual Builder or dive deep with the precision of the policy-as-code approach. With every policy, fortify your software's security and guarantee unwavering compliance. 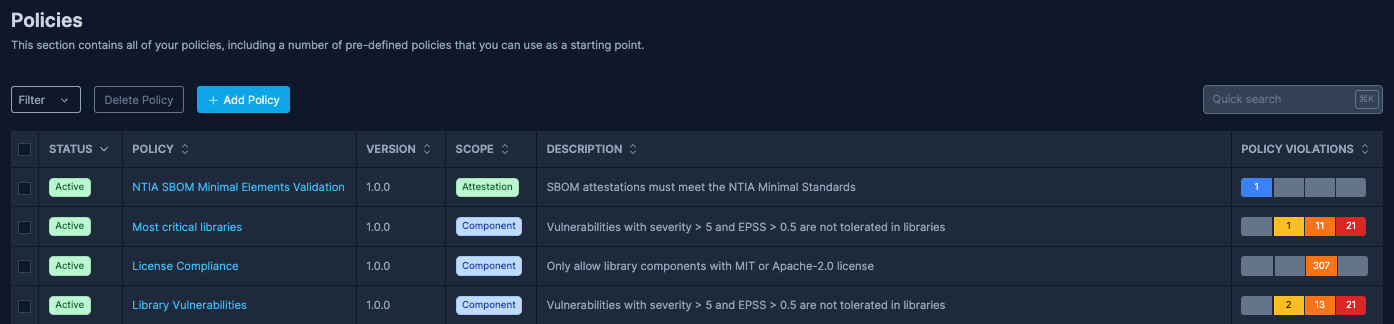
Visual builder or Policy as Code?
The visual policy builder in SBOM Observer is designed to make policy creation intuitive and straightforward, removing the complexity of manual code-based policy definitions. With this builder, users can efficiently define rules, set conditions, and manage software component policies with ease.
But if you want full control and want to creade advanced policies, or want to version control your policies then using creating policies as code is the way to go!
Create policies using the Visual Builder
The Visual Policy Builder in SBOM Observer provides a user-friendly interface to define and manage policies for your software components.
This guide will walk you through the different sections and functionalities of the builder based on the provided screenshot. 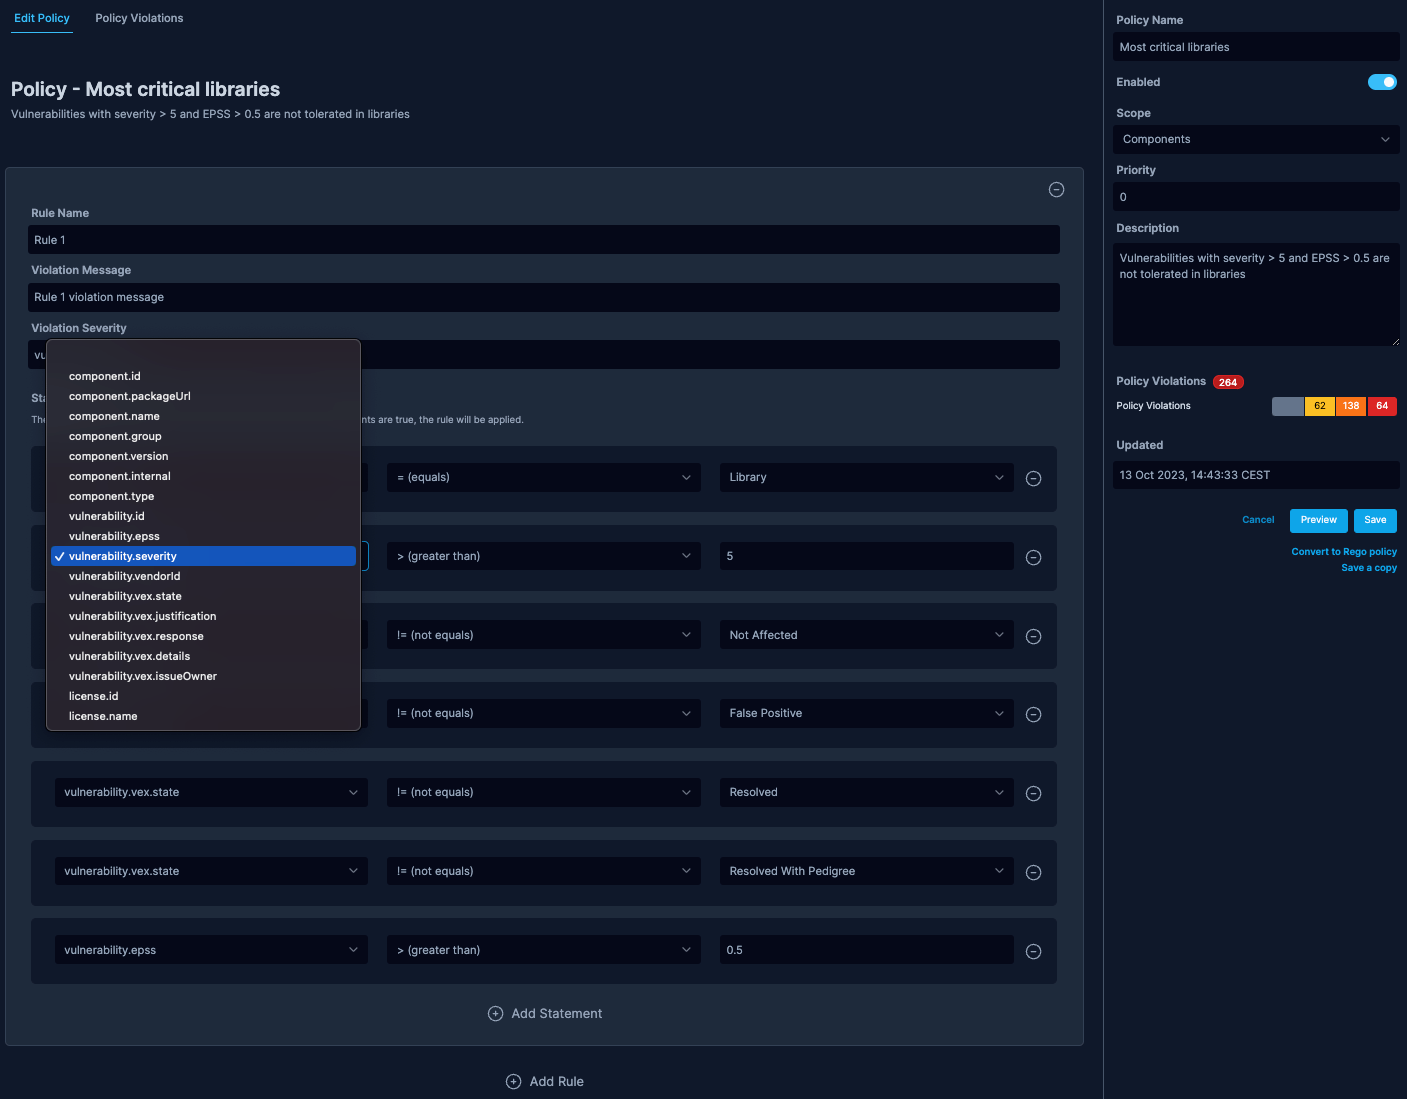
Each section of the visual builder will be described below.
Edit Policy / Policy Violations tabs
- Edit Policy: Click to edit the current policy details.
- Policy Violations: Shows a detailed breakdown of policy violations with a count. It provides a quick overview of the policy's enforcement status.
Policy sidebar
- Policy Name: Displays the name of the policy. In the example, the policy is named Most critical libraries.
- Enabled Toggle: Use this toggle to enable or disable the policy.
- Scope: Defines the scope of the policy. It can be set to various values, e.g., Components.
- Priority: Sets the priority level of the policy. Only relevant if you have multiple policies running in parallel.
- Description: A brief description of the policy, providing insights into what the policy enforces or checks.
Rule Builder
- Rule Name: Name your rule for easy reference.
- Violation Message: Set a custom message that will be displayed when the rule is violated.
- Violation Severity: Define the severity level of the violation.
Building a Rule:
Statement Block: Use this section to define the conditions of your rule.
- Property Dropdown: Choose from a list of available properties like component.type, vulnerability.severity, etc.
- Operator Dropdown: Choose the desired operator (e.g., equals, not equals, greater than) to set your condition.
- Value Field: Input the value you want the property to be compared against.
Add Statement: Click this to add another condition to the rule. All conditions within a rule are treated as AND conditions.
Add Rule: Create additional rules for the policy. All rules within a policy are treated as OR conditions.
Action Buttons
- Cancel: Discard changes made to the policy.
- Preview: Preview the policy and see potential results without saving.
- Save: Save the changes made to the policy. This will overwrite previous configuration.
- Convert to Rego Policy: Convert the visually built policy into a Rego policy format.
- Save a Copy: Save a copy of the current policy configuration into a new policy.
Convert to Rego Policy
The visual builder is an excellent tool for quickly drafting policies. However, once you convert to a rego code-based policy, you cannot revert to the visual format.
As a safety measure, consider using Save a copy to preserve the visual policy version before making the conversion.
Benefits of policies as code - Rego and JavaScript
Version Control: Policies can be tracked and versioned using tools like Git, allowing you to maintain a history of changes, roll back to previous versions if needed, and collaborate with others seamlessly.
Advanced Customization: With Rego or JavaScript, you can write more intricate and tailored policies that surpass the capabilities of the visual builder. This grants you the flexibility to address complex scenarios and requirements specific to your environment.
Consistency Across Environments: By defining policies as code, you ensure that the same policy logic is applied universally across various systems and environments, leading to predictable and consistent outcomes.
Create policies using Rego
While the Visual Builder offers a convenient and intuitive interface for policy creation, using Rego provides an alternative approach for those who prefer a code-based method.
Rego allows for more granular control, offering greater flexibility and precision in defining policy logic. Whether you're familiar with coding or seeking to leverage the advanced capabilities of policy-as-code, Rego offers a powerful toolset to craft your security and compliance policies. 
What is Rego?
Rego is a high-level declarative language primarily designed for expressing policies over complex hierarchical data structures. Originating from the Open Policy Agent (OPA), a cloud-native policy engine, Rego offers a way to offload policy decisions from your software. With Rego, you can specify policies as code, enabling automation, versioning, and more.
Basics of Rego
If you're new to Rego, consider familiarizing yourself with its basics. The official Rego documentation offers a comprehensive overview.
Rego Policy Example
The example below demonstrates how to create a policy using Rego. This policy checks if certain software libraries have vulnerabilities that surpass set thresholds.
package observer

import future.keywords.in

violation[v] {
	input.component.type == "library"

	some vulnerabilitiy in input.vulnerabilities
	vulnerabilitiy.severity > 5
	vulnerabilitiy.epss > 0.5

	# vex
	not vulnerabilitiy.vex.state == "not_affected"
	not vulnerabilitiy.vex.state == "false_positive"
	not vulnerabilitiy.vex.state == "resolved"
	not vulnerabilitiy.vex.state == "resolved_with_pedigree"

	v := {
		"severity": vulnerabilitiy.severity,
		"message": sprintf(
			"%s with severity>5 (%v) and EPSS>0.5 (%0.2f) is not tolerated",
			[
				vulnerabilitiy.vendorId,
				vulnerabilitiy.severity,
				vulnerabilitiy.epss,
			],
		),
	}
}
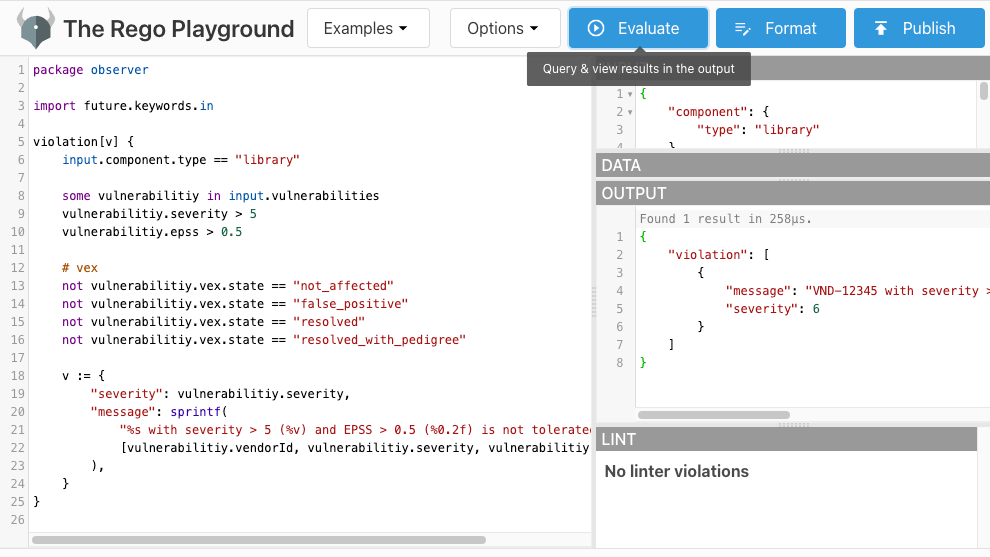
Rego Playground
The Rego Playground is an interactive platform that allows you to write, evaluate, and test Rego policies. It's a useful tool for both beginners looking to learn and experts looking to test and debug their policies (providing instant feedback on potential violations).
The provided link leads to a pre-set example of a policy alongside input data. By selecting the Evaluate button, you can instantly discern if any policy violations occur.
Ideal for both Rego novices seeking to grasp the basics and experts aiming for policy refinement, the playground makes the policy creation process both efficient and intuitive.
Create policies using JavaScript
Crafting policies using JavaScript allows you to implement custom logic in a familiar and flexible programming language. To facilitate this, you must define a function named Policy which accepts specific parameters and outputs an array of violation objects based on the logic you define.
How the Policy Function Works
The Policy function acts as the core of your JavaScript-based policy. It performs the following tasks:
Takes Input: The function parameters typically consist of specific properties like component, vulnerabilities that your policy should evaluate.
Processes Logic: Within the function, you will define the conditions and rules your policy consists of. You can perform various operations such as loops, conditionals, and utilize standard JavaScript libraries and functions.
Returns Violations: If the policy conditions are met (indicating a violation), the function will return an array of objects. Each object represents a distinct violation, detailing the nature and severity of the issue.
Handles No Violations: If no violations are found based on the input data, the function should return null to indicate compliance.
Defining the Policy Function
Below is an updated example of how you might define a Policy function in JavaScript. This example checks if any component has vulnerabilities that exceed a certain severity threshold and if so, returns details about those vulnerabilities.
function Policy({ component, vulnerabilities }) {
  const SEVERITY_THRESHOLD = 7; // Define the severity threshold

  if (vulnerabilities && vulnerabilities.length > 0) {
    return vulnerabilities
      .filter((vulnerability) => vulnerability.severity > SEVERITY_THRESHOLD)
      .map((vulnerability) => ({
        severity: vulnerability.severity,
        message: `${component.name} has a high-severity vulnerability (ID: ${vulnerability.vendorId}, Severity: ${vulnerability.severity}). Immediate attention required.`,
      }));
  }

  return null;
}
In the provided example function:
- We define a severity threshold of 7 to check against.
- We filter and map through each vulnerability associated with a component.
- If a vulnerability's severity exceeds our threshold, we return the corresponding violation details.
- We return the list of violations if there are any; otherwise, we return null.
Preview Policies
Remember to test your JavaScript policies thoroughly to ensure they behave as expected and accurately reflect your compliance and security requirements.
One good way is to Preview the policies to see the actual results of the policy you are defining or have defined.
Input data to policies
When crafting policies using JavaScript, it is essential to understand the structure of the input data provided to the policy. This input data typically consists of detailed information about a software component and its associated vulnerabilities. The primary purpose of providing this data is to enable the policy to evaluate and determine if there are any policy violations based on the specific attributes of the component and its vulnerabilities.
The input data multiple properties such as:
component: This section includes details about the software component, such as its unique ID, package URL, type (e.g., library, application), version, licensing information, and creation or update timestamps.
vulnerabilities: An array that contains information about each vulnerability associated with the component. Each vulnerability object provides the unique ID, severity level, vendor ID (typically a CVE identifier), and other related details. Additionally, there might be extra information, such as notes about the vulnerability or the vendor's extended vulnerability exposure (vex) data.
namespace: Contains details about the organizational scope or context in which the component resides, like the tenant ID and space.
The sample below provides a typical representation of such input data. With this structured input, the policy can iterate through vulnerabilities, evaluate them against defined criteria, and decide if any of them pose a potential risk that warrants a violation. Knowing the precise structure and content of this input is crucial for crafting effective and accurate policies.
{
  "component": {
    "id": "34c0f4772324dec6d00af7127a6f7454f655bc0d",
    "packageUrl": "pkg:npm/zod@3.21.4",
    "type": "library",
    "version": "3.21.4",
    "attestations": {
      "7e0a765450f52e957f8cb1346c75ec1d2e2ccb5f0559dce1b2d258713fec28a6": "pkg:npm/zod@3.21.4"
    },
    "createdAt": "2023-10-30T18:28:35.757164+01:00",
    "updatedAt": "2023-10-30T18:28:35.761883+01:00",
    "name": "zod",
    "internal": false,
    "licenses": [
      {
        "license": {
          "name": "MIT"
        }
      }
    ]
  },
  "vulnerabilities": [
    {
      "id": "8820c737e3913979bead47ce9e309ea153e1f7d1",
      "component": "34c0f4772324dec6d00af7127a6f7454f655bc0d",
      "advisoryId": "2b751df5f20cf64cd2656c2b1a0301ceac79413d",
      "severity": 7.5,
      "vendorId": "CVE-2023-4316",
      "epss": 0.00046,
      "createdAt": "2023-10-30T18:38:13.011539+01:00",
      "updatedAt": "2023-10-30T18:38:13.015045+01:00",
      "notes": "",
      "vex": {
        "id": "vex-01HE0T3CR5DD72KJNSF05X79ZF",
        "vulnerability": "CVE-2023-4316",
        "affects": ["34c0f4772324dec6d00af7127a6f7454f655bc0d"],
        "state": "not_affected",
        "justification": "requires_configuration",
        "response": ["will_not_fix"],
        "author": "7d2d0f7f0792796ff84ddf7b4578ac20773211d0",
        "issueOwner": "7d2d0f7f0792796ff84ddf7b4578ac20773211d0",
        "published": "2023-10-30T18:29:20.261386+01:00",
        "createdAt": "2023-10-30T18:29:20.261386+01:00",
        "updatedAt": "2023-10-30T18:29:20.261521+01:00"
      }
    },
    {
      "id": "a1b2c3d4e5f69780b1c2d3e4f5a67890b1c2d3e4",
      "component": "34c0f4772324dec6d00af7127a6f7454f655bc0d",
      "advisoryId": "3f4a5b6c7d8e9fa0b1c2d3e4f5a6789ec1d2e3f4",
      "severity": 8.8,
      "vendorId": "CVE-2023-9999",
      "epss": 0.6,
      "createdAt": "2023-10-30T19:00:00.123456+01:00",
      "updatedAt": "2023-10-30T19:00:00.123789+01:00",
      "notes": "This vulnerability is due to an insecure default configuration allowing remote code execution.",
      "vex": null
    }
  ],
  "namespace": {
    "tenantId": "org-4dec6d00af7127a6",
    "space": "default"
  }
}